Integrate Stripe dashboard from your site
Stripe's customer portal is awesome, but you need to give them a link to click on to get there. This walks you through what you need to make that happen.


The need for this article was born out of my own needs to solve a problem, and that I didn’t want to use Netlify auth and faunaDB, as Jason Lengstorf wrote about them, for authentication and storage. Instead both are in Supabase.
This is going to be a long one, so get yourself a cup of coffee / tea / whatever, save this to your bookmarks or read later list, and let’s dig in.
In this post I’m going to talk about the following:
- What is this, why do you even need it?
- What are the parts that I’m going to walk you through, and why they’re important
- Gather required data / services
- Walkthrough of the Supabase part
- Walkthrough of the hosted function on Netlify / Getting the Stripe link
- Walkthrough of the hosted function on Netlify #2 / Function to keep data up to date when things happen in Stripe
- Walkthrough of the Stripe configuration
- Walkthrough of the client side JavaScript part on your own site
- Tying it all together
Let’s get started!
What is this and why do you even need it?
Stripe is awesome, for the most part. It can take care of a lot of different things when it comes to charging your customers:
- charges their card
- provides a receipt / invoice if you have that configured
- provides superb API access to pretty much every single minute detail about their payment / subscription
- provides a way, through the API, to pretty much change everything for them, or have them change it for themselves
- takes care of taxation, calculation, metered charging
- has a way for them to sign up to a subscription without ever having to create an account on your site (this is important, and will get back to this very shortly)
It’s quite frankly astounding the amount of work that’s gone into it. One thing they do not have though: a really easy way for them to log into a dashboard where they can manage every detail on a user interface.
We’ve run into this situation where we’re offering a way for them to pay for a thing on a monthly recurring basis. Because user data is hot potato, we don’t want to store any of it unless we have to. Ideally only Stripe should hold data for the user, as they need it anyways for providing payment services.
Remember that Stripe can give a link that we can send people so they can buy a specific product / sign up for a specific subscription without us having to touch / hold any of their details? It worked flawlessly for this. One downside though:
Once their cards got expired, or they needed to cancel, we couldn’t tell them how to do it themselves, because Stripe does not have a customer area that folks can log in, and because we don’t hold details about them, we also didn’t have a dashboard they could log in where we could make use of the API to do stuff to their subscriptions.
The only alternative, therefore, was that they emailed us, and we logged in and did the things for them. For cancellations it worked, but for updating card details? Not so much... Obviously we’re not going to ask their new card details, and similarly we’re not going to let them log into our Stripe account to do it for themselves. There has to be a way 🤔.
Enter Stripe customer portal
So turns out that Stripe does actually have a place where Stripe customers can manage their own stuff, however they don’t work out of the box, and you need to integrate it: https://stripe.com/docs/billing/subscriptions/integrating-customer-portal.
It’s superbly useful for enabling our subscribers to manage their own things, however there are a few caveats and downsides and moving parts: we, as the shops charging customers money to access our products and services, need to be involved.
Main reason Stripe can’t allow them to log in is because they don’t know where to log them in. If I bought something from 45 different stores that all use Stripe in the past 5 years, and gave all of them my email address and I tried to log into Stripe using my email address, they can’t really figure out which account of the 45 I would want to manage. To tell Stripe I would need to send them some other identifier that would point to a specific shop, that I don’t have, can’t have, and shouldn’t have.
To configure the customer portal as a shop, I need to give the customer a session link where I basically tell Stripe “hey, I know who they are, I want you to create a session for them that relates to my store, so they can manage their subscription details that you’re holding for them for my store.”
Making sure this is secure and only the correct people get the session links is not a hugely complicated task, but it still took me a good week and a bit of thinking about it and experimenting with what I need to do to whittle the code down into the absolute bare minimum.
What are the parts that I’m going to walk through, and why they’re important
1. Netlify function to grab a Stripe session link
To make the customer portal work, we need to send an API request to Stripe with our secret API key and the customer’s Stripe ID to create a session for them. In return we’re going to get a few URLs which we can present to the actual human, who can click on them so they can edit their details.
Data needed for this needs to live server side where you can make sure they won’t be visible to the end users on the front end because these secrets, if compromised, can do some real damage to your Stripe account.
Additionally we need another function that listens to Stripe webhooks so when a new customer signs up for a new subscription, we can insert the data into our table of email address -> Stripe customer IDs.
2. Supabase instance to handle user authentication and email - Stripe ID relationship
We need to know who the human on the other end is, and what their Stripe customer IDs are. The customer IDs are just identifiers, they’re not something that the customers would ever need to know, and even if they did, I would not trust them that they’re giving me correct details. If they gave me someone else’s valid customer ID and I didn’t do any checking, I could let them in to manage someone else’s account, which is Very Bad™.
However every customer I have should have an email address associated with them, which means I can do some validation and have some additional safety.
From the Stripe admin area I can grab all my subscriptions, their customers, and their data, which means I can have a list of Stripe customer ID and email address relationships.
On top of that Supabase has a neat feature where you can sign in / sign up with only an email magic link without creating a password. This means I can get people to tell me their email addresses, send them a magic link, and when they click that I can look up whether I have a customer ID for their email address or not.
3. Client side JavaScript and form elements on your site
The entire flow above will also need to be kicked off from your site, rather than somewhere random. That gives your customers an added layer of safety / safeguarding that it is indeed you who want them to manage their own details.
Fortunately there aren’t many parts that you need to have, and some of these you already do.
Gather required data
Netlify account and a repository where you store the function
You need a github account, and a Netlify account. You can sign up to the latter using the former. You can also take my function code, and deploy it your own Netlify account, set some environment variables, point a domain at it, and you’re good to go. I’ll go into more details about these soon.
The environment variables we’re going to use are:
FRONTEND_URL
STRIPE_API_KEY
STRIPE_WEBHOOK_SECRET
SUPA_ANON_KEY
SUPA_DANGER_KEY
SUPA_JWT_SECRET
SUPA_URL
I’ll write about this in more details when going into the details of Netlify, but for now open a new file and start collecting data that will go into these env vars.
Stripe API key
If you go into your Stripe account, on the top right corner there will be a Developers link, which will take you to a screen about API access. On the left on that screen there’s an API Keys menu item.
In that menu towards the bottom there’s a section about restricted keys. We need one of those to make sure that even if the key, somehow, gets out, it can’t do anything besides what we need right here.
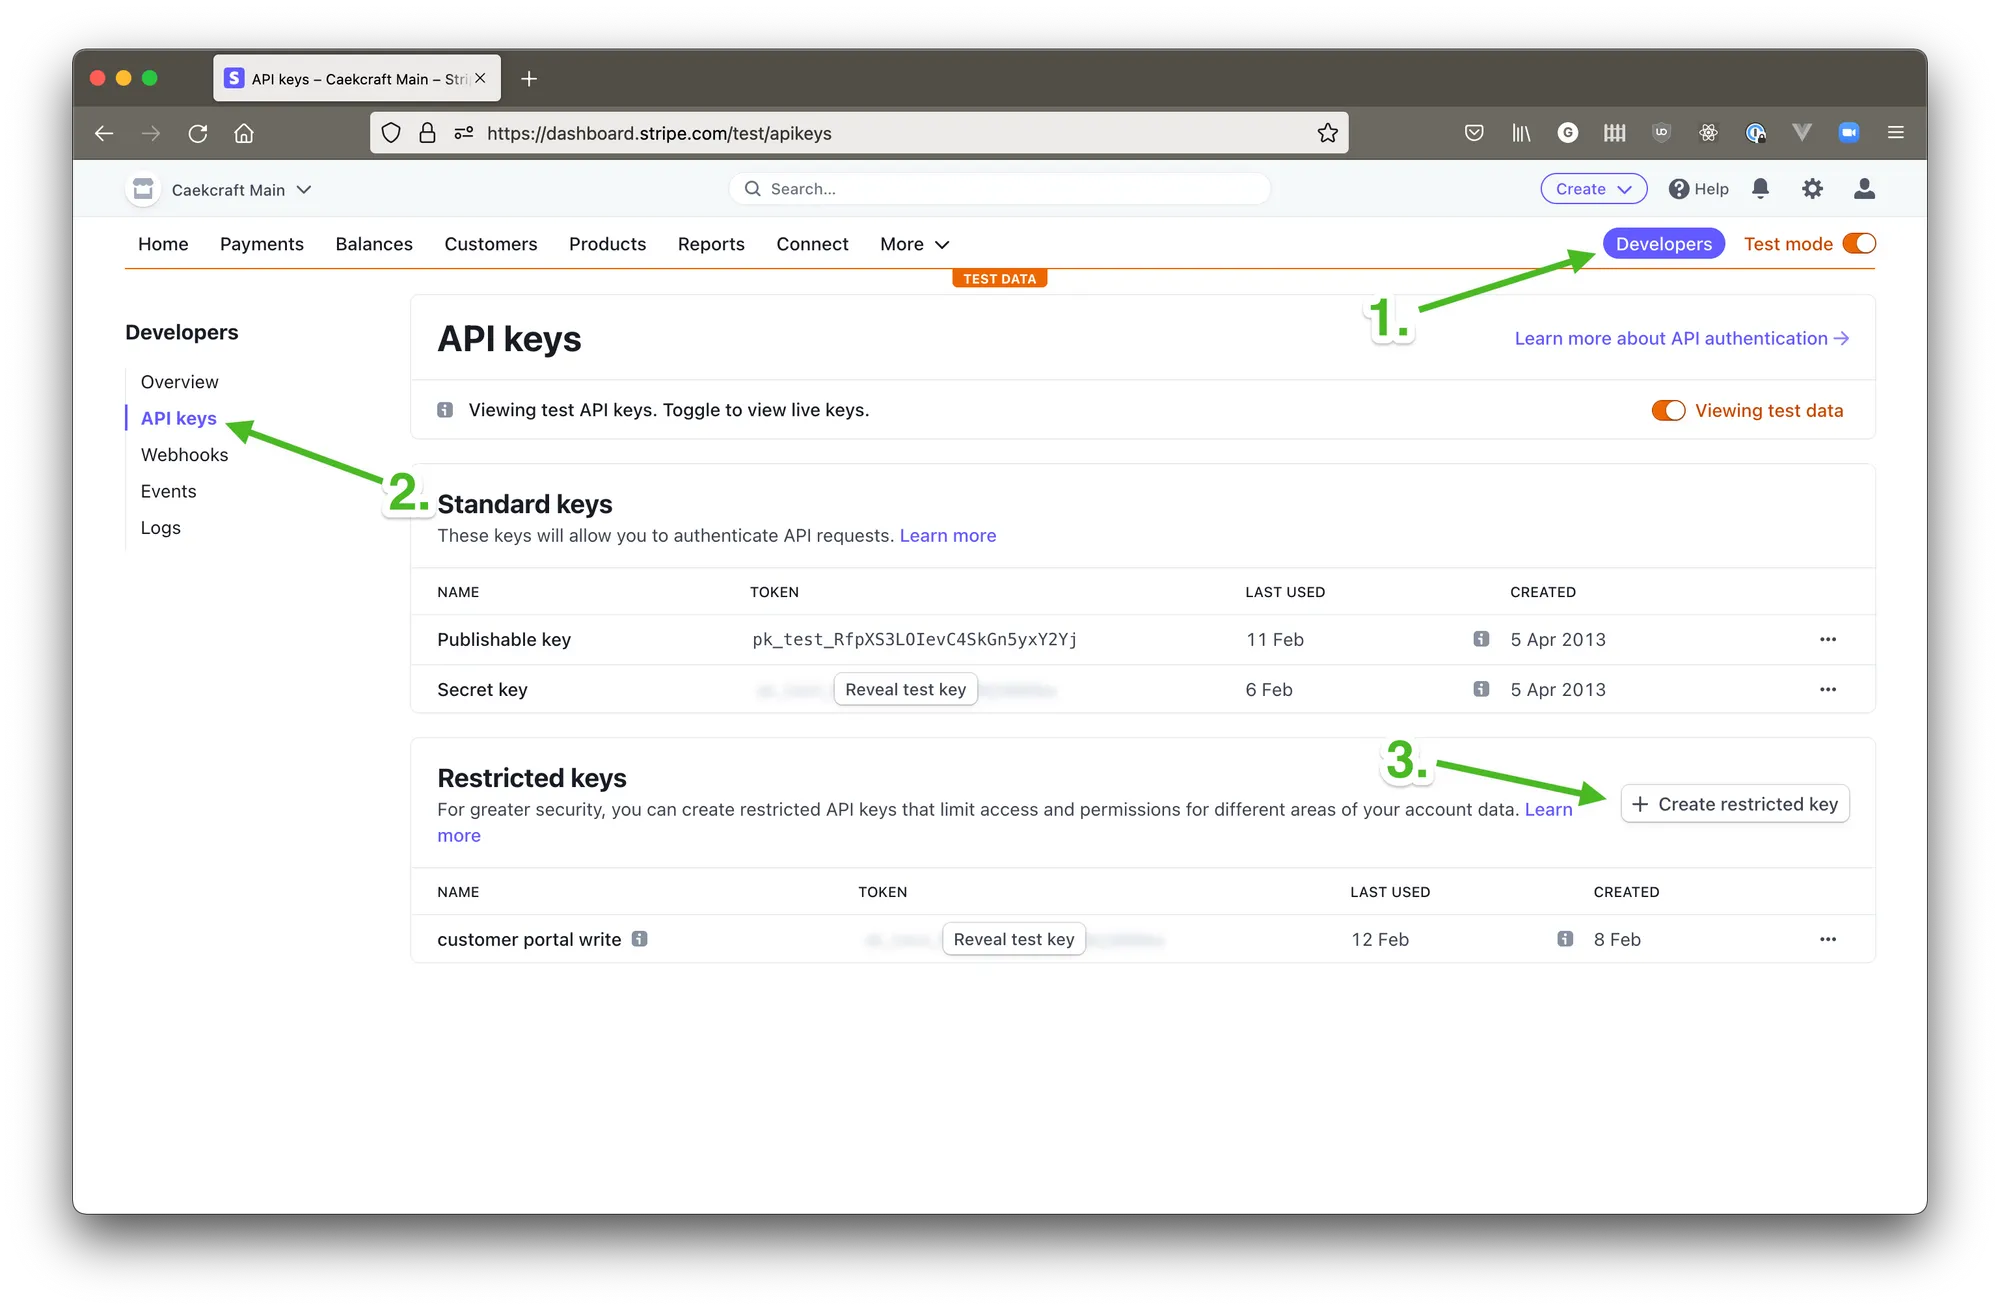
Go ahead and click on the Create restricted key + button, give it a name that will tell you what this is for (1), find the permission Customer portal (3) under All Billing Resources (2) and select Write (4) in the left column, and leave it on None (5) on the right column.
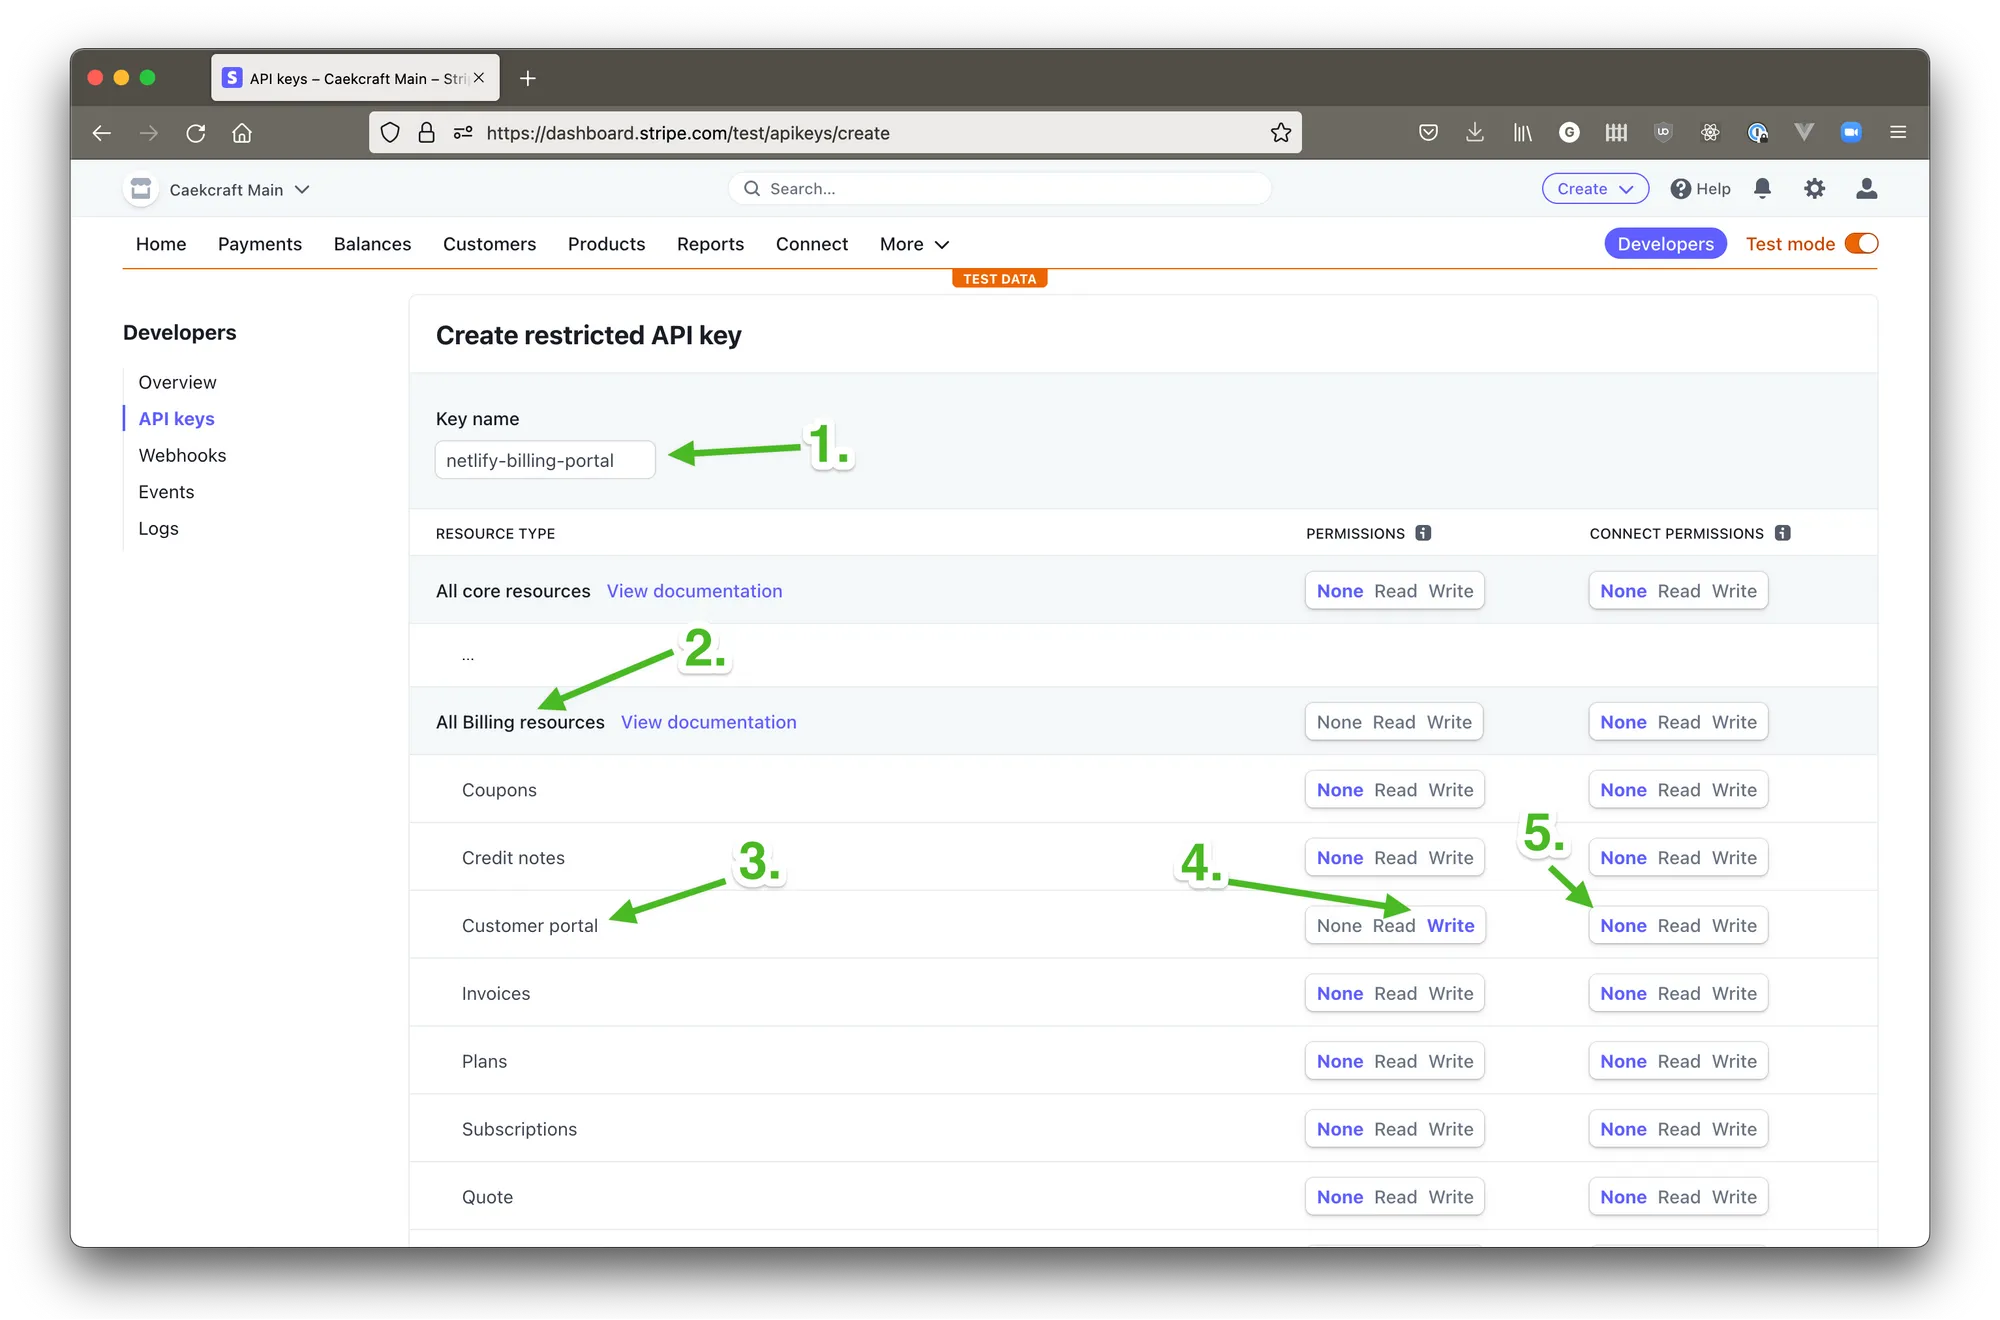
Save that key somewhere, we’re going to need it for Netlify. This is going to be our STRIPE_API_KEY.
Stripe webhook signing secret
We’re not setting this up just yet, because we will need to set up our Netlify function first. Without knowing the URL of the Netlify function, we also can’t set up a webhook, and without setting up a webhook, there’s no signing secret.
We’ll come back to this later
Supabase account, url, anon key, service role key, and jwt secret
Sign up for an account at https://supabase.com/. You will need to have a Github account.
There, once you create a project, you need to grab your anon key (1), service role key (2), URL (3), which will look like https://<project id>.supabase.io, and jwt secret (4). You will need these four as environment variables in your Netlify site for the function.
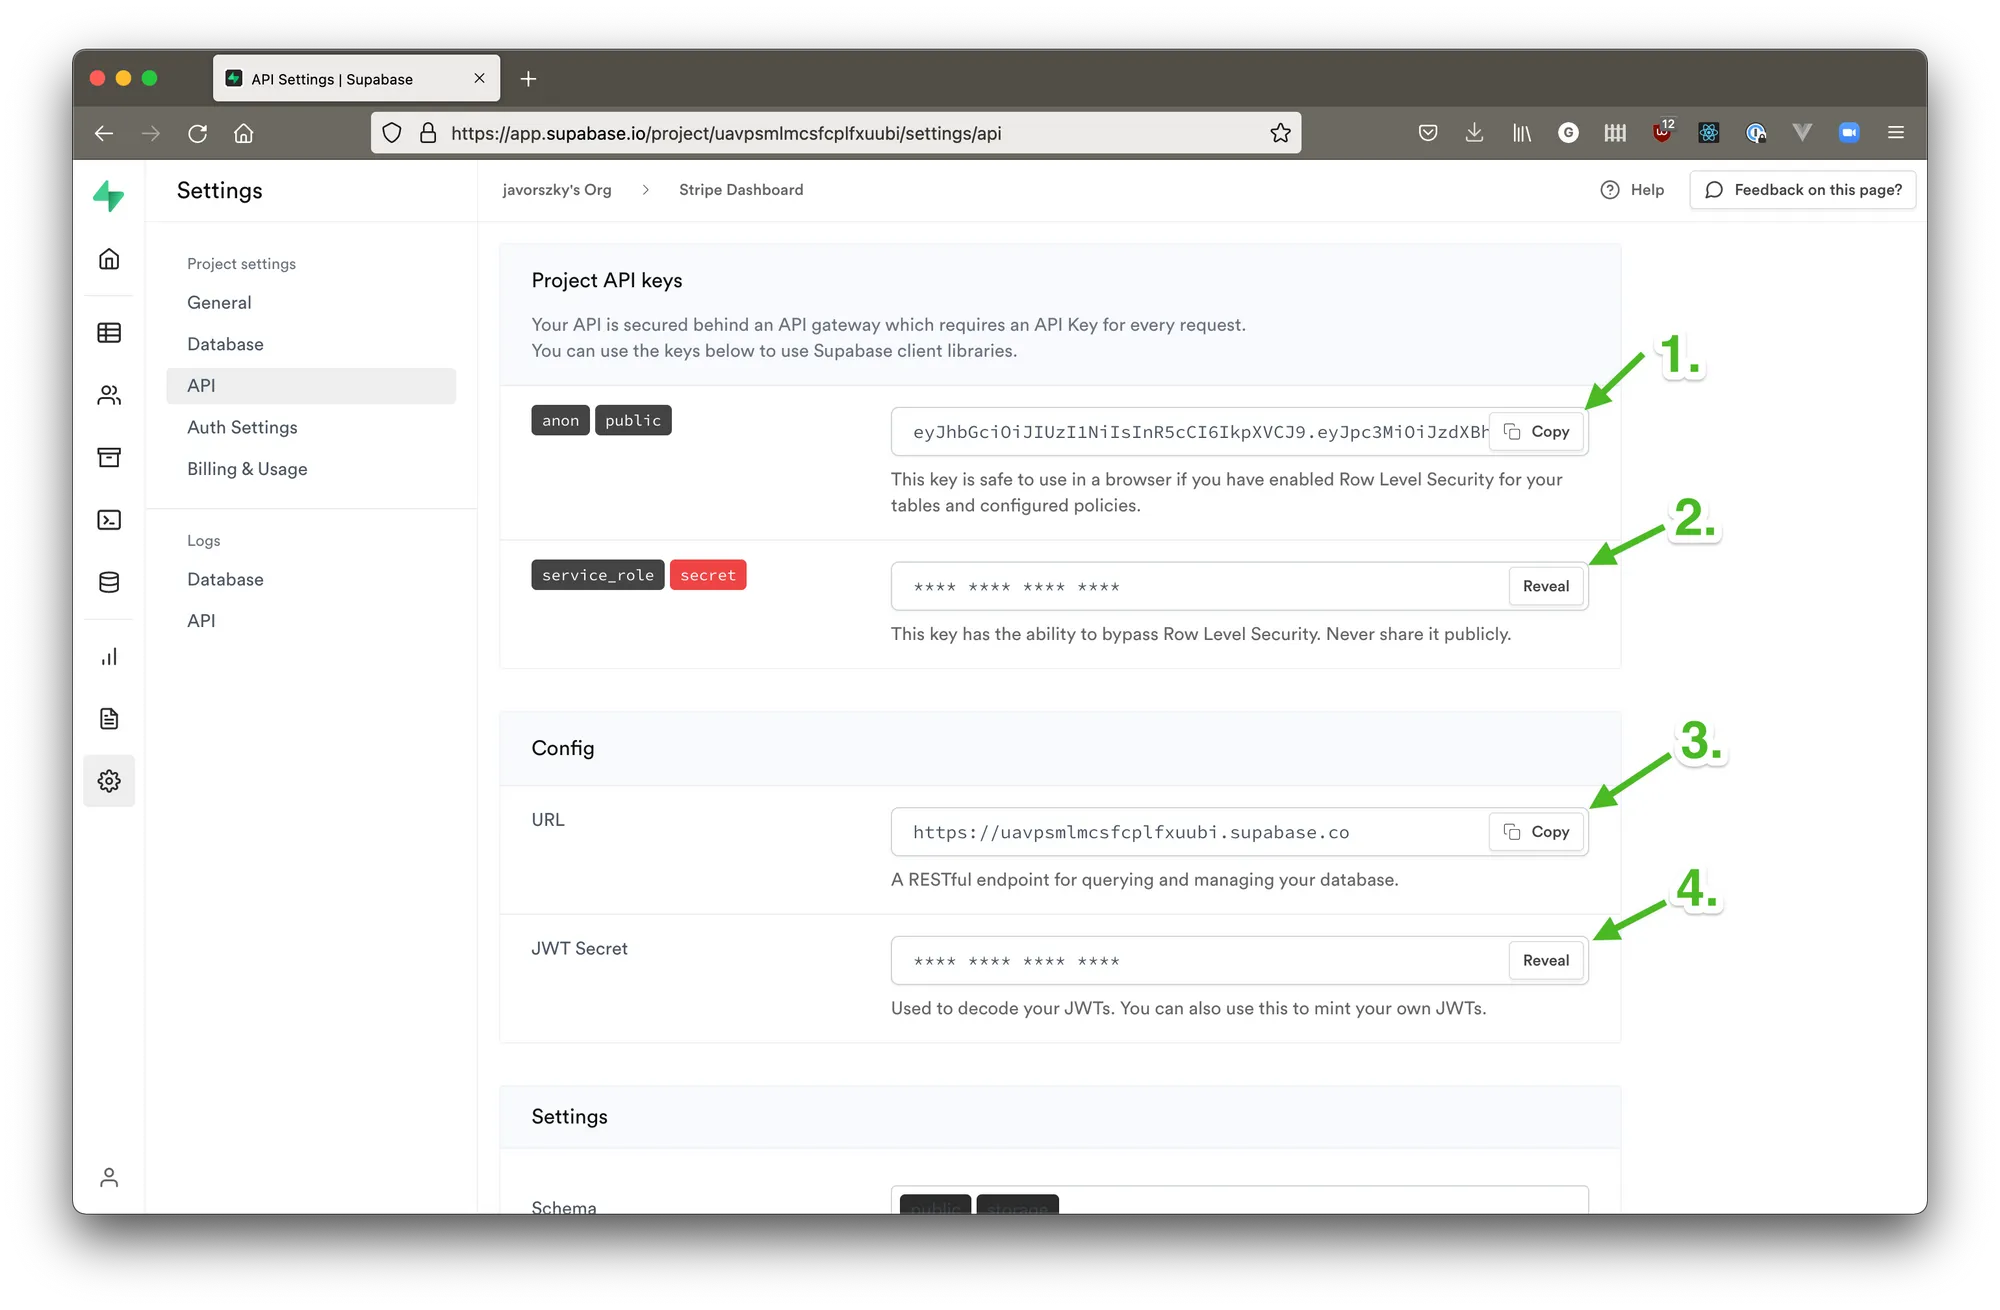
They will be our SUPA_ANON_KEY for the anon key, SUPA_DANGER_KEY for the service role key, SUPA_URL for the URL, and SUPA_JWT_SECRET for the jwt secret.
URL of the page where the user starts the process
This is so Stripe can receive a return URL, which is needed for the request. It’s going to be the URL where the client side JavaScript lives, including the form elements and the buttons that are needed to make this work. This will be our FRONTEND_URL.
Walkthrough of the Supabase part
The Supabase functionality has two parts to it.
On one hand we need the enable folks to sign in via an email magic link, on the other hand we need to have a list of email addresses and customer IDs.
Email magic link signups
Most of this functionality is going to be in the client side JavaScript part of this guide, but there are a few things we need to set in Supabase really quick.
Go to the project settings, and inside there, Auth settings. The following pieces need to be changed to the following values:
- JWT expiry should be a low value, like 2-3-5 minutes. We will only use the issued jwt token to send to the Netlify function to grab a customer ID, to then send to Supabase to fetch data. The whole thing should only take less than 1 minute anyways, but let’s be generous here. The field is in seconds, so take that into account. 5 minutes is 300 seconds.
- Disable signup should be turned off. That’s to enable people to sign in / sign up. The email one is an upsert, if the email address did not exist in our list of authenticated users, it will the very first time they try to sign in.
- Email auth / Email signup needs to be turned on.
- Double confirm email changes and Enable email confirmations should both be turned on.
- Custom SMTP needs to be turned off, unless you’re sending out thousands of these email, in which case have a look at Mailgun.
- Everything else under that setting on the page should be turned off.
Table to hold our relationships
Create a new table that looks like this
CREATE TABLE stripe_customers (
    id uuid DEFAULT uuid_generate_v4() NOT NULL PRIMARY KEY,
    email TEXT NOT NULL,
    stripe_customer_id TEXT NOT NULL CONSTRAINT stripe_customer_id_key UNIQUE
);

CREATE INDEX stripe_customers_email_idx ON stripe_customers (email);
This has four parts:
- an internal id for serialisation
- a column for email addresses
- a column for the related Stripe customer ID that’s unique
- an index on the non-unique email column to make lookup faster
This is the table where you’re going to insert all your data from Stripe. At this point it might be a good idea to do that anyways.
Row level security
If you click on the little caret next to the table’s name and choose edit table, you will have the option to enable row level security. Make sure that there’s a tick next to it.
Once done, head over to Settings -> Auth settings -> Policies. There you should see the table you just created with a button called New Policy on the right hand. Click that. We’re going to add a policy where a user can only read rows where their email address is the same as the value in the email column making sure we won’t accidentaly allow people to gain access to someone else’s user portal in Stripe.
Create a policy from scratch, name it whatever you wish, make sure the SELECT option is selected, and in the text box add this:
auth.email() = emailClick review. The entire text of the policy should look something like this. The name is most likely different:
CREATE POLICY "Select when email is the same"
ON stripe_customers
AS permissive
for SELECT TO public
USING (auth.email() = email);
Once you’re happy with it, click Save policy, and we’re mostly done.
There will be one more place where we’ll need to add a piece of configuration, but we need to set up Netlify for that first.
Walkthrough of the hosted function on Netlify
Getting the Stripe session links
Here’s the code. You can click on the Deploy on Netlify button to immediately deploy it to your account.
https://github.com/javorszky/stripe-dashboard
Otherwise I recommend you fork it and then create a new site and connect it to your new fork repository. But I digress...
There are two functions in the repository. This section deals with the generate-stripe-links.js one.
Environment variables
In order to use the provided Netlify function as-is, the environment variables you need to store are the following:
SUPA_JWT_SECRET– so that we can verify the tokens we’re actioning. You should already have this saved from when I wrote about it in the Supabase secionSUPA_ANON_KEY– thepublicanonkey from Supabase. See the section about setting it up aboveSUPA_DANGER_KEY– when a new user signs up to a new subscription, or you delete a customer, Stripe will send a webhook with what changed. We need this key to track these changes in our Supabase store. Normally we use the JWT Supabase gives the user who just signed in, but since the webhook doesn’t have a user, we need a general key with enough power. This is thatSUPA_URL– the url you got from Supabase. It looks likehttps://<project id>.supabase.coSTRIPE_API_KEY– this is the restricted key you created earlier from StripeSTRIPE_WEBHOOK_SECRET– we don’t have this yet, will be explained laterFRONTEND_URL– this is the URL where the user enters their email address to start the process of getting a session link
The main event in that repository is the netlify/function/generate-stripe-link.js file.
It has three parts:
- the actual handler
- function to grab the customer ID from Supabase
- function to grab the link from Stripe
The only two requirements that you need are the official Stripe JavaScript SDK, and the axios package to make sending http requests easier.
https Node package and send the naked requests to both Stripe and Supabase with the necessary headers. You have all the information. I found the https package a bit unwieldy, and I’m lazy to figure it out, and JavaScript is not my main language, and Node.js is also not a technology I spent a lot of time with recently.Handler
We don’t need the axios or Stripe SDK for the handler part, they are omitted from here.
const crypto = require("crypto");

exports.handler = async function (event, context) {
  accessToken = event.body;
  parts = accessToken.split(".");

  header = parts[0];
  payload = parts[1];
  signature = parts[2];

  const hash = crypto
    .createHmac("sha256", process.env.SUPA_JWT_SECRET)
    .update(header + "." + payload)
    .digest("base64url");

  if (hash !== signature) {
    return {
      statusCode: 403,
      body: JSON.stringify({ message: "jwt signature verification failed" }),
    };
  }

  const stripeIDs = await getStripeIDFromSupabase(accessToken);
  const links = await getStripeSessionLink(stripeIDs);

  return {
    statusCode: 200,
    body: JSON.stringify({ links: links }),
  };
};

const getStripeIDFromSupabase = async function (accessToken) {
  // later
};

const getStripeSessionLink = async function (stripeID) {
  // later
};
The handler function is the one that receives our POST request from the client side JavaScript with the jwt token that Supabase gives us (details later). It then verifies that the jwt token is indeed valid, which is why we needed the jwt_secret from Supabase, to make sure that the requests that we’re handling are actually coming from us.
We then pass the entire jwt token to the function that fetches the customer IDs from Supabase. Once we have those IDs, we ask Stripe to create session links for each of them.
Finally we return the links in a 200 message to the caller, our front end. There’s nothing special going on here.
Get customer ID from Supabase
const axios = require("axios").default;


const getStripeIDFromSupabase = async function (accessToken) {
  let custID = [];

  await axios
    .get(process.env.SUPA_URL + "/rest/v1/stripe_customers", {
      headers: {
        apikey: process.env.SUPA_ANON_KEY,
        Authorization: "Bearer " + accessToken,
      },
    })
    .then((response) => {
      if (response.status !== 200) {
        throw new Error("response from supabase is not 200");
      }

      if (!response.data || response.data.length === 0) {
        throw new Error("data is either missing, or empty array");
      }

      for (const cust_record of response.data) {
        custID.push(cust_record.stripe_customer_id);
      }
    })
    .catch((error) => {
      console.error("so axios errored: ", error);
    });

  return custID;
};
This does one very simple request to Supabase. It receives the access_token, which is the entire jwt that Supabase gives the front end once the email magic link was clicked and the user is authenticated, and uses that, plus the anon key, to make a request against our stripe_customer_id table.
Because we have both the anon key, AND the jwt token specific to this user, AND row level security set up such that a user can only read rows that relate to themselves only, the only two possibilities that that request can run into are:
- there is data relating to the user, it will return all rows for the user
- there is no data relating to the user, here’s an empty array as a response
This is also why we don’t need to specify additional query arguments that would normally be used in the WHERE clauses in the query.
Get Stripe session link
Now that we have a list of customer IDs and a restricted key with Write permission on the Customer portal property, we can grab the session links:
const stripe = require("stripe")(process.env.STRIPE_API_KEY);

const getStripeSessionLink = async function (stripeIDs) {
  let sessions = [];

  for (const id of stripeIDs) {
    const session = await stripe.billingPortal.sessions.create({
      customer: id,
      return_url: process.env.FRONTEND_URL,
    });

    sessions.push(session);
  }

  return sessions;
};
It is remarkably simple. We take the Stripe API key, create an instance of the Stripe SDK, which sets up the context with headers and stuff, and then send a request to the billing portal to create a billing session for each of the given Stripe IDs and return them to the caller which will output the links on your site.
This can throw an error if the customer does not exist, or the key does not have necessary permissions.
Walkthrough of the hosted function on Netlify #2
Function to keep data up to date when things happen in Stripe
The other function in the repository is called create-entry-webhook.js. This is the function that Stripe will send its webhooks to when a new customer is created, an existing one is updated, or a customer is deleted.
When you created this project, you had to manually figure out / export all of your subscriptions, grab their customers, and grab the email addresses from those customers. It’s data in a snapshot of time.
Keeping that data up to date manually every time something changes is not great, so you need an automated way of getting Stripe to tell our table in Supabase what’s happening. That’s this.
I broke the function into three different parts: handler, upsert, delete.
Handler
const stripe = require("stripe")(process.env.STRIPE_API_KEY);

exports.handler = async function (payload, context) {
  const sig = payload.headers["stripe-signature"];
  let event;

  try {
    event = stripe.webhooks.constructEvent(
      payload.body,
      sig,
      process.env.STRIPE_WEBHOOK_SECRET,
    );
  } catch (err) {
    return {
      statusCode: 400,
      body: JSON.stringify({ message: err.message }),
    };
  }

  let customer;
  let error;
  switch (event.type) {
    case "customer.created":
    case "customer.updated":
      customer = event.data.object;
      error = await upsertUser(customer.email, customer.id);
      if (error !== null) {
        return {
          statusCode: 500,
          body: JSON.stringify({
            message: "could not create / update user",
            error: error.message,
          }),
        };
      }

      break;
    case "customer.deleted":
      customer = event.data.object;
      error = await deleteUser(customer.id);
      if (error != null) {
        return {
          statusCode: 500,
          body: JSON.stringify({
            message: "could not delete user",
            error: error.message,
          }),
        };
      }
      break;
    default:
      console.warn(`Unhandled event type ${event.type}`);
  }

  return {
    statusCode: 200,
    body: JSON.stringify({ message: "Ok" }),
  };
};
It does two important things.
- It makes sure that the payload is actually coming from Stripe. They sign the webhooks, and we need to validate that.
- Depending on the event type, we will either send the request to the upsert, or delete functions to be processed.
Upsert user
Insert or update if exists. At this point we know that the webhook is coming from Stripe.
const axios = require("axios").default;
const URL = require("url").URL;

const upsertUser = async function (email, customer_id) {
  const upsertURL = new URL("/rest/v1/stripe_customers", process.env.SUPA_URL);
  upsertURL.searchParams.append("on_conflict", "stripe_customer_id");

  const requestData = {
    email: email,
    stripe_customer_id: customer_id,
  };

  let errorNull = null;

  await axios
    .post(upsertURL.href, requestData, {
      headers: {
        apikey: process.env.SUPA_ANON_KEY,
        Authorization: "Bearer " + process.env.SUPA_DANGER_KEY,
        Prefer: "resolution=merge-duplicates,return=representation",
      },
    })
    .then((response) => {
      if (response.status !== 200 && response.status !== 201) {
        throw new Error("response from supabase is not 200 or 201");
      }

      if (!response.data || response.data.length !== 1) {
        throw new Error("data is either missing, or more than one row");
      }
    })
    .catch((error) => {
      errorNull = error;
    });

  return errorNull;
};
Couple of things going on here:
- We construct the URL. Supabase exposes the Postgres database to the world using the PostgREST library, which means we get to avoid the Supabase SDK for this functionality. Part of that URL is specifying that there’s a possibility we might conflict on the Stripe customer ID, which is a unique key. That’s the query argument.
- Then we put together the request itself with the URL, request body, the authentication headers, and another one called
Prefer. That one instructs the database on what to do when there’s a conflict when inserting a record, and how to represent the data that gets inserted or changed. Theprefer: resolution=merge-duplicatesheader value and theon_conflict=stripe_customer_idessentially translate to “if while trying to insert a record into the table, and there’s a conflict on the Stripe customer ID, update the row with the rest of the data instead.” - At the end either null, or if there was an error, an error is returned.
Delete user
const axios = require("axios").default;
const URL = require("url").URL;

const deleteUser = async function (customer_id) {
  const deleteURL = new URL("/rest/v1/stripe_customers", process.env.SUPA_URL);
  deleteURL.searchParams.append("stripe_customer_id", "eq." + customer_id);

  let errorNull = null;

  await axios
    .delete(deleteURL.href, {
      headers: {
        apikey: process.env.SUPA_ANON_KEY,
        Authorization: "Bearer " + process.env.SUPA_DANGER_KEY,
        Prefer: "return=representation",
      },
    })
    .then((response) => {
      if (response.status !== 200) {
        throw new Error("response from supabase is not 200");
      }

      if (response.data && response.data.length === 0) {
        return;
      }

      if (!response.data || response.data.length !== 1) {
        throw new Error("data is either missing, or more than one row");
      }
    })
    .catch((error) => {
      errorNull = error;
    });

  return errorNull;
};
Much the same as with the upsert user. The main change is the HTTP method being used (delete instead of post), and the query argument.
The query arg takes a form of stripe_customer_id=eq.cus_1234567xx. That’s a PostgREST functionality called Horizontal Filtering. It means delete from the table where the column stripe_customer_id has a value equal to whatever we passed in.
It does nothing if the passed in ID did not exist in our database, which is great, because Stripe will send the webhook even if you delete a customer that did not have a subscription with you.
Deploy the function
Once you deployed the function into a new Netlify site, you can take note of its URL, or assign a domain to it, that part is up to you. At the end of the day, we need either its own Netlify URL, or the domain you chose, and do a bit of settings dance.
- First, add the URL to the environment variables on your site to the key
FRONTEND_URL. - Second, go into Stripe, and set up a webhook.
Set up Stripe webhook
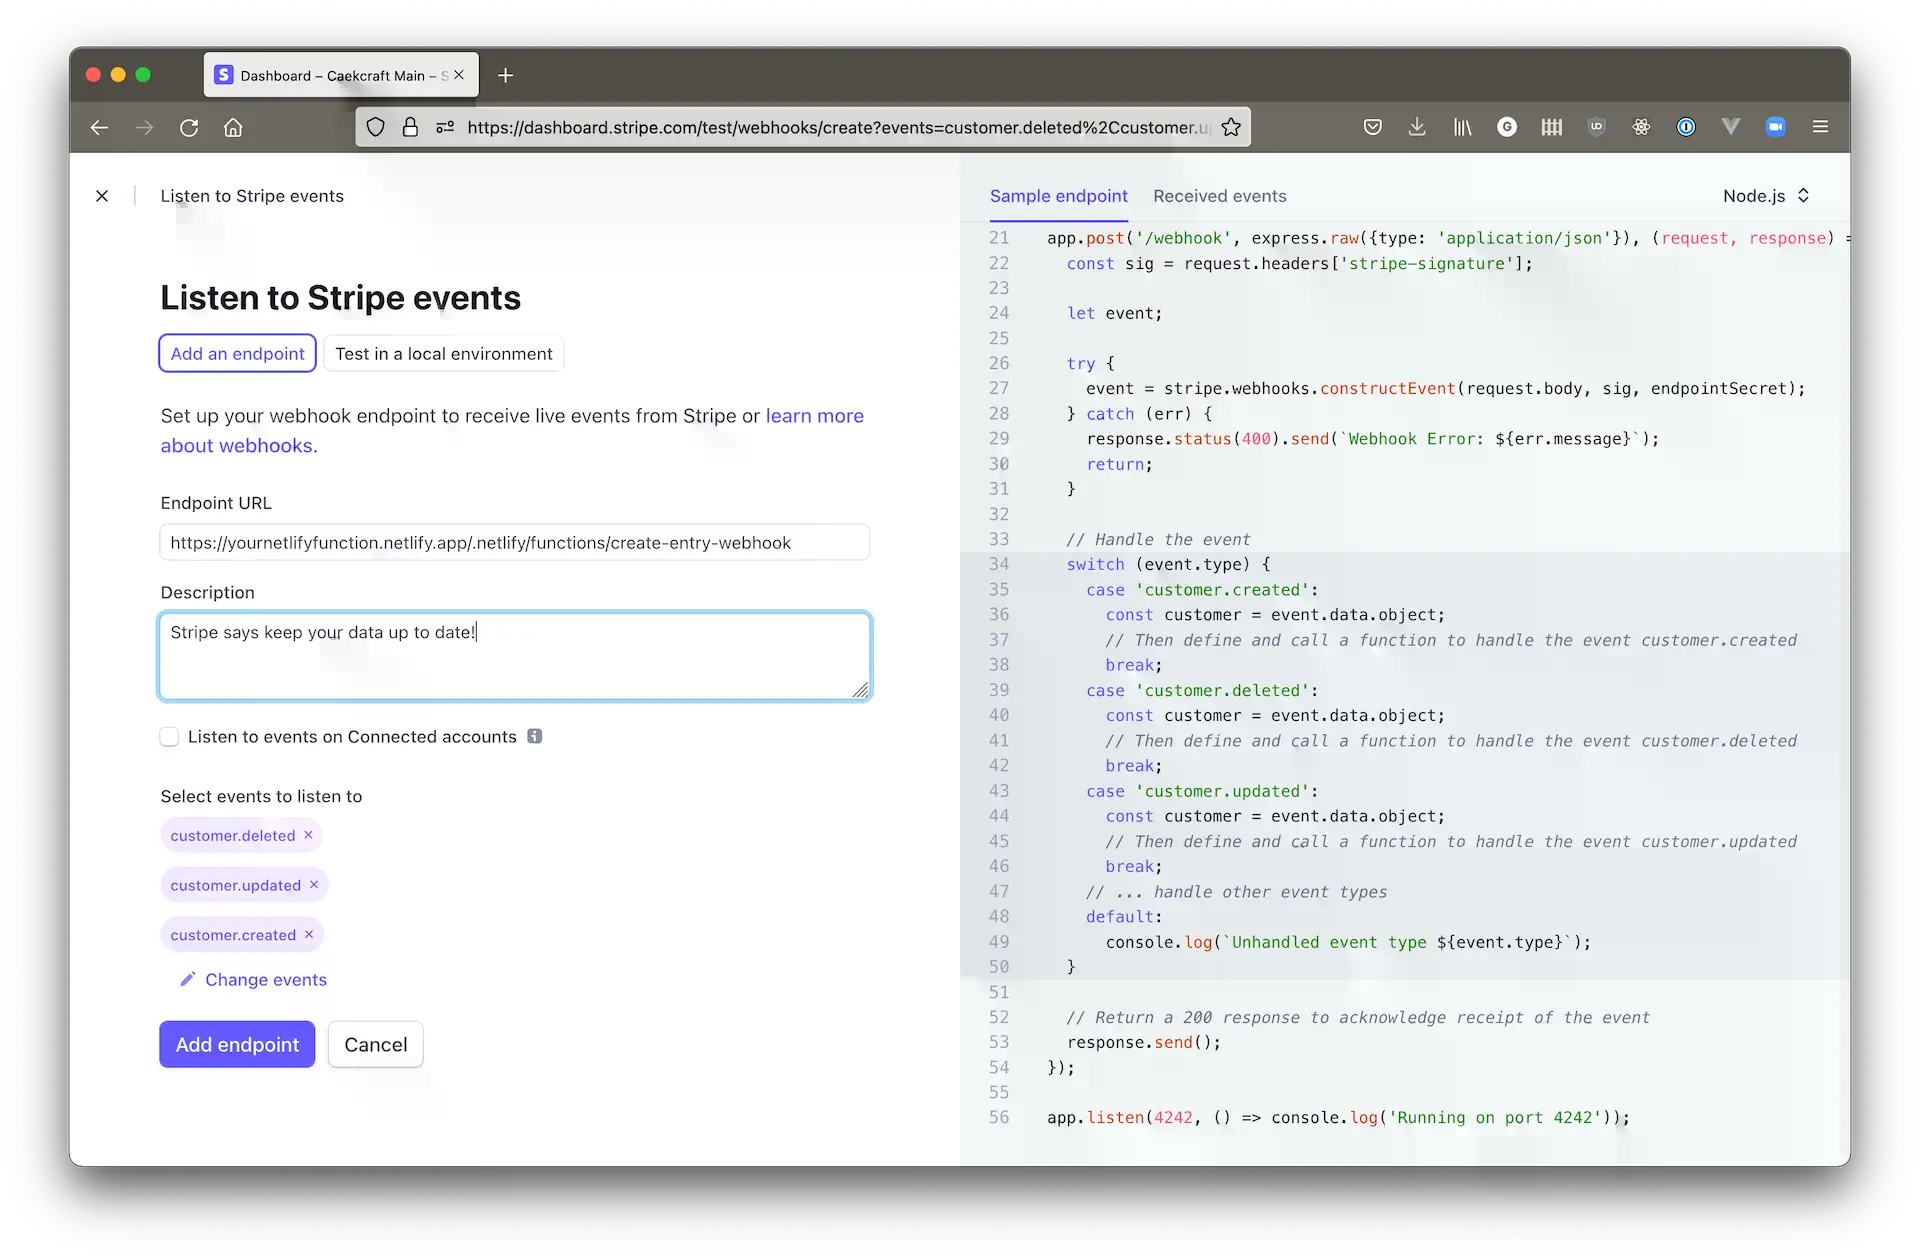
Once you’re back in your Stripe dashboard, go to the Developers and webhooks section, and click Add endpoint.
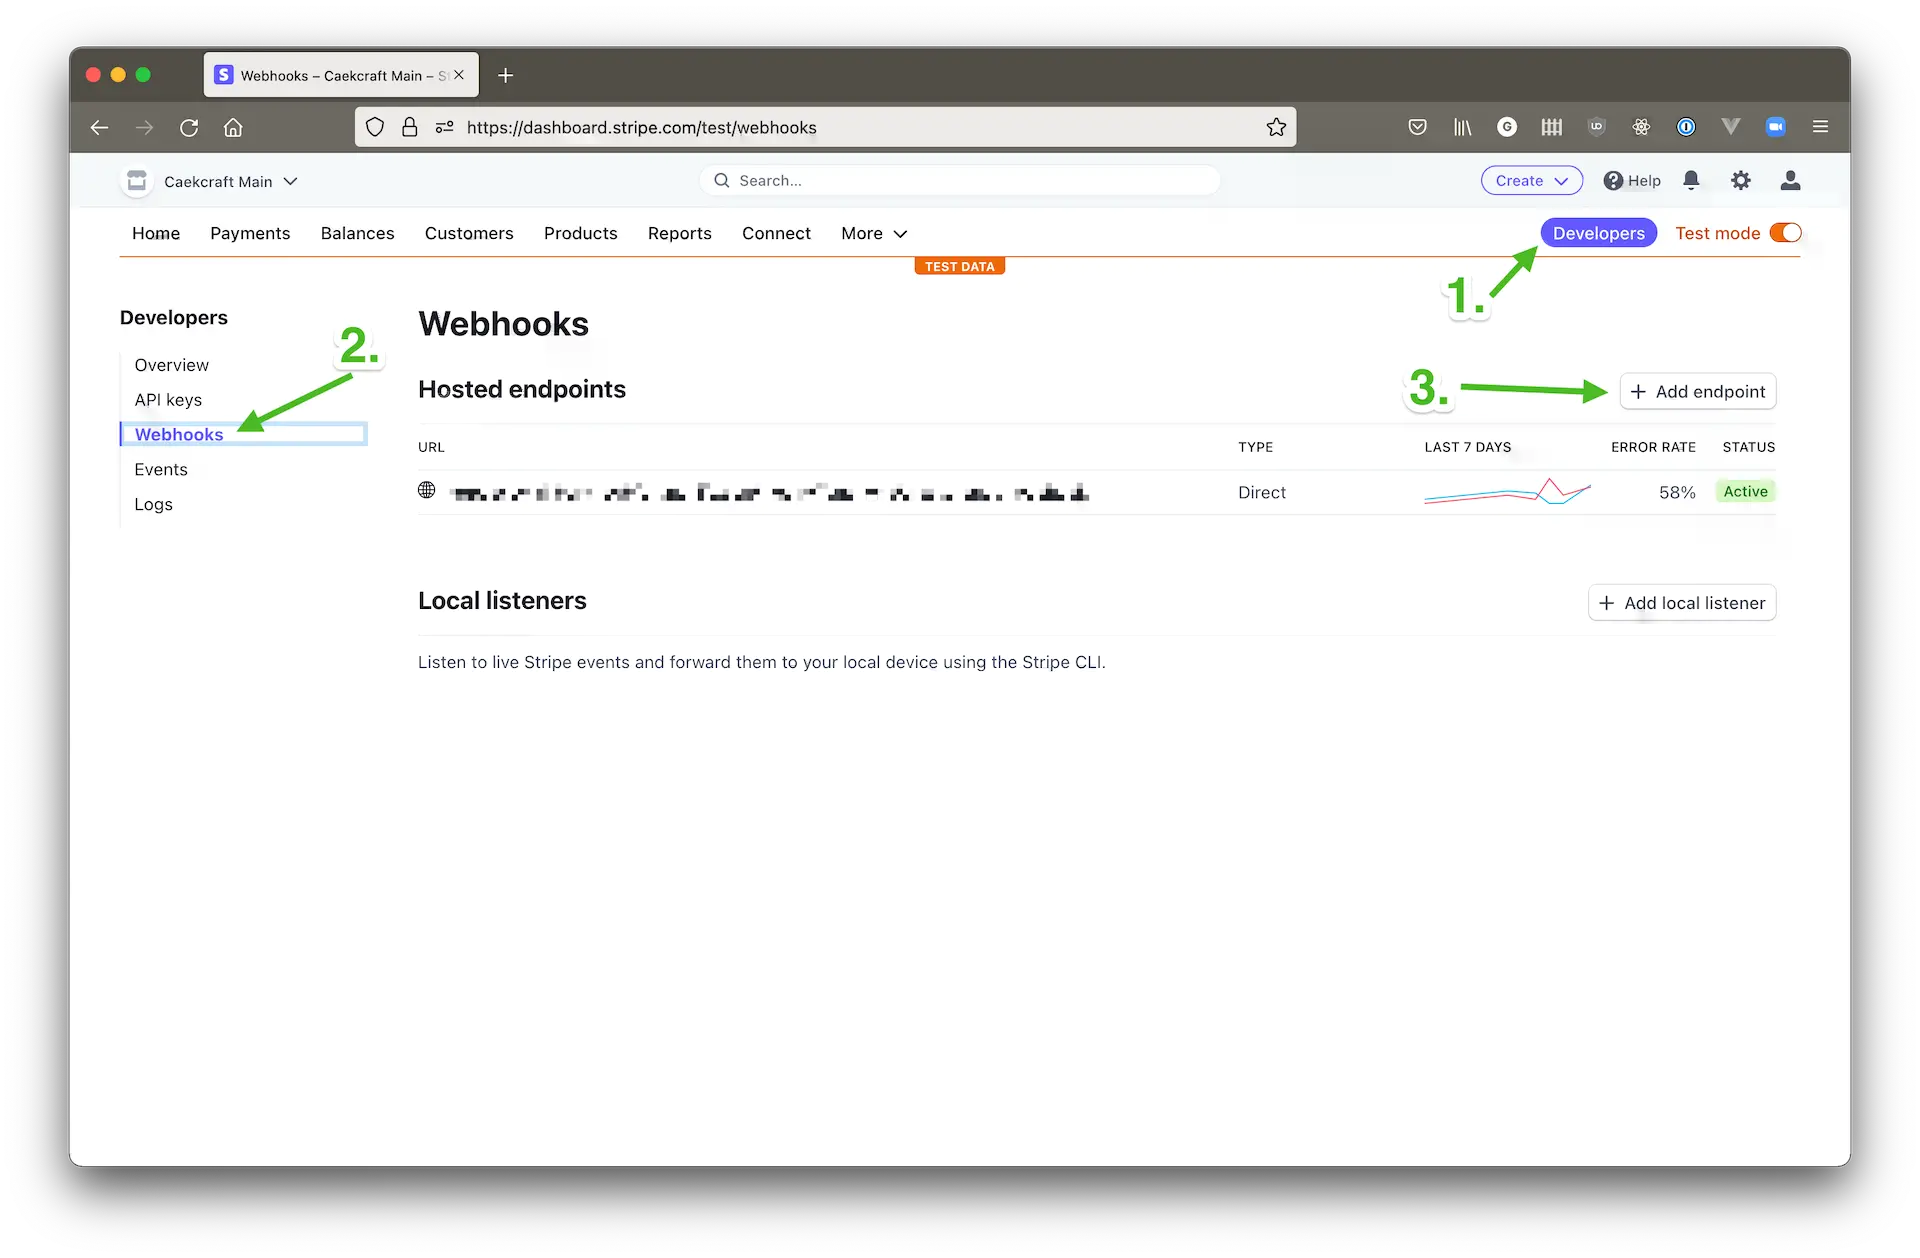
On that screen do the following:
- Select Add an endpoint. The other choice is Test in a local environment, which we don’t want
- For the endpoint URL, paste in your Netlify function’s URL, and append
/.netlify/functions/create-entry-webhook. The dot is important in front ofnetlify, and thecreate-entry-webhookpart is the name of the file, minus the.jsextension. It should look like this:https://<netlify id>.netlify.app/.netlify/functions/create-entry-webhook. - Add a description of your choosing.
- Leave Listen to events on Connected accounts unticked.
- Click select events, find the Customer tab, and in there select
customer.created,customer.updated, andcustomer.deleted. - Ignore the generated code on the right hand side, that’s mostly already in the functions :).
At the end you should look at a page similar to this:
Click the blue Add endpoint button, and you will be taken to a page which will have its basic information there, including the signing secret, which we need. Click on the Reveal link under the signing secret part:
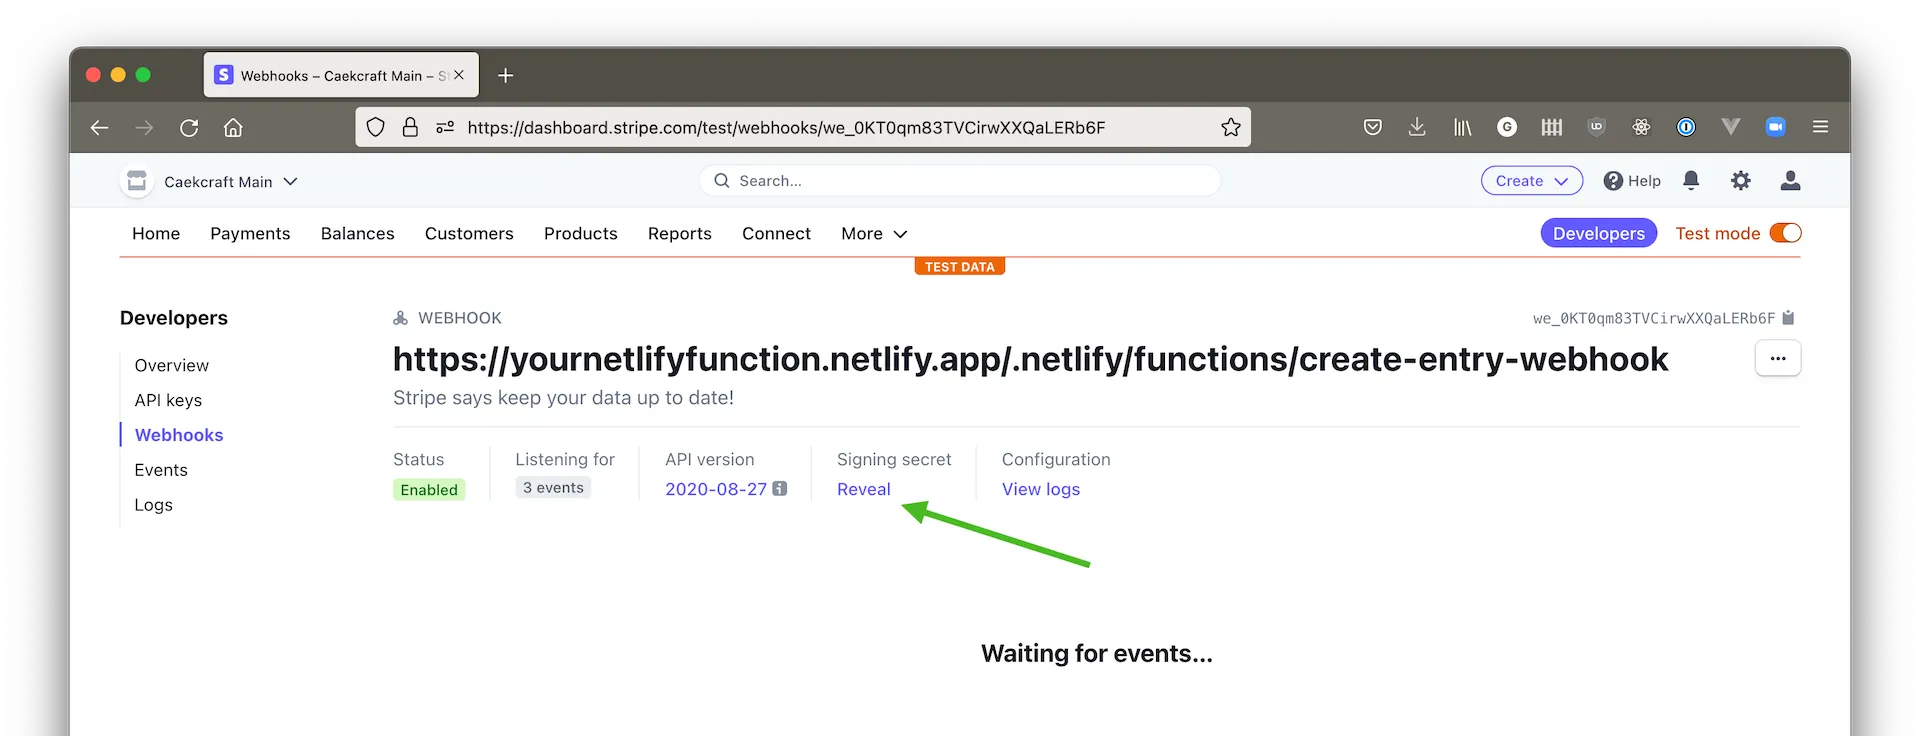
Once you’ve taken note of that, we can update the environment variable STRIPE_WEBHOOK_SECRET with that value in Netlify.
That pretty much takes care of every part on the back end side of things. Our front end code is left.
Walkthrough of the client side JavaScript part on your own site
This part has the most flexibility in it. There’s a minimal working code included in the repository using HTML and plain JavaScript, and you’re encouraged to adopt it to whatever your current front end is using, be it React, Vue, Angular, Ember, or something else. The important parts are:
- Have to have an email text input where your customers can supply the emails. The email type is using html5’s email validation rules, but any text field will do.
- A button so the customer can explicitly start the process of signing in and getting access to their Stripe dashboard.
- A function that will take the email address and call the Supabase API with it to sign the user in / up.
- An HTML node where the data returned can be displayed as separate session links for every customer object Stripe holds for that email address.
- JavaScript functionality to handle all of the above.
HTML
<!DOCTYPE html>
<html lang="en">
  <head>
    <meta charset="UTF-8" />
    <meta http-equiv="X-UA-Compatible" content="IE=edge" />
    <meta name="viewport" content="width=device-width, initial-scale=1.0" />
    <title>Document</title>
    <script src="https://cdn.jsdelivr.net/npm/@supabase/supabase-js"></script>
    <script src="./index.js"></script>
  </head>
  <body>
    <h1>magic link</h1>
    <form action="#" method="post" id="sbform">
      <label for="email">
        gimme yer email
        <input type="email" id="email" />
      </label>
      <button type="submit">Sign in</button>
      <button type="reset" disabled>Sign out</button>
    </form>

    <div id="the-links">
      <h2>Links</h2>
      <p>
        You have <span class="num"></span> customer entries for us in Stripe.
        You can click either to manage that subscription for that customer
        entry. Take note of your customer ID.
      </p>
      <ul></ul>
    </div>
  </body>
</html>
Pretty standard stuff. It pulls in the Supabase JavaScript SDK for front end things, our own js file, creates a form with an email input and two buttons in it; one to sign in, another to sign out from Supabase, and has a div with an empty ul to put our results and a span to indicate how many links we got back.
JavaScript
Setup
There are a bunch of different parts to it. Let’s start with the setup:
const SUPABASE_URL = "https://uavpsmlmcsfcplfxuubi.supabase.co";
const SUPABASE_KEY =
  "eyJhbGciOiJIUzI1NiIsInR5cCI6IkpXVCJ9.eyJpc3MiOiJzdXBhYmFzZSIsInJvbGUiOiJhbm9uIiwiaWF0IjoxNjQzMTI5NTc1LCJleHAiOjE5NTg3MDU1NzV9.e0aZ2SUi8lpURmx72EmqKSZgvmAUYazp28Tus7PKl6Y";

const supabase = supabase.createClient(SUPABASE_URL, SUPABASE_KEY);
var signUpForm;
var linksDiv;
var linksNum;
var linksUl;
var signOutButton;
var signedIn = false;

document.addEventListener("DOMContentLoaded", function () {
  signUpForm = document.querySelector("#sbform");
  linksDiv = document.querySelector("#the-links");
  linksNum = linksDiv.querySelector("span.num");
  linksUl = linksDiv.querySelector("ul");
  signOutButton = signUpForm.querySelector('button[type="reset"]');

  signUpForm.onsubmit = signIn.bind(signUpForm);
  signUpForm.onreset = signOut.bind(signUpForm);
});
This sets up the variables that we need to use in the rest of the function, including instantiating a Supabase client with the URL and the anon key. This is safe to use here, you can know about it, by the time you’re reading this, I will have changed the key anyways. The vars declare the variables to hold the node elements once we have the entire DOM contents loaded.
Then we wait until everything on the page arrives so we don't assign empty nodes to variables only to have them arrive later. In the same event we also bind two functions to the two buttons.
Signup
Let’s move on to the sign up functionality:
const signIn = (event) => {
  event.preventDefault();
  const email = event.target[0].value;

  supabase.auth
    .signIn({ email })
    .then((response) => {
      if (response.error) {
        throw new Error("signin error: " + response.error.message);
      }
    })
    .catch((err) => {
      console.error(err.response.text);
    });
};
This is bound to the form submit event, so first thing’s first, let’s stop what the form would be doing and grab the email that’s in the input box.
Then we call supabase.auth.signIn with the email, which will send out a magic link to the email address. Clicking that link will actually sign them in. This is why you needed to tell Supabase about your front end, because the link itself is on a Supabase domain, and they will need to redirect the user somewhere, preferably your site.
The whole point of the magic link is that we want to make sure that the people are who they are, and we can be reasonably sure that they’re who they say they are if they have access to the email address that Supabase sent the login link to.
When the user clicks the magic link and they get taken to the Supabase site, it will create a token, redirect to the front end URL you set up with a code, and exchange that code for a login session token which is then set as a cookie. That will trigger a supabase.auth.change event.
Supabase auth.onChange event
supabase.auth.onAuthStateChange(async (event, session) => {
  if ("SIGNED_IN" === event) {
    const response = await fetch("/.netlify/functions/generate-stripe-links", {
      method: "POST",
      body: session.access_token,
    });

    signOutButton.disabled = false;

    const result = await response.json();

    displayLinks(result.links);
  }

  if ("SIGNED_OUT" === event) {
    signOutButton.disabled = true;
    displayLinks({});
  }
});
This is where we actually call the Netlify function on line 3. On the signed in event we send a POST request to the generate-stripe-links function with the entire jwt token, so it can do the whole dance of getting the session links for the user identified by the jwt, and return it.
We also need to now enable the sign out button, and display the links that we got back from the function.
Display links
const displayLinks = (payload) => {
  linksNum.innerHTML = payload.length;
  let lx = "";
  for (const [_, value] of Object.entries(payload)) {
    lx += '<li><a href="' + value.url + '">' + value.customer + "</a></li>";
  }

  linksUl.innerHTML = lx;
};
This alone is probably worth using React or Vue or whatever for 😂.
Given the links and the customer IDs, construct some markup, and put it in front of the user so they can click on either of them. That’s all.
Sign out
Of course now that they’re signed in and they can see the links, the Supabase SDK will keep refreshing the token every x seconds that you set the time to live to making them signed in forever.
If they’re on a shared computer or just want to log out for whatever reason, they need to have a way to do that. The sign out button is of type reset, and the functionality is already bound to the action of pressing it.
const signOut = (event) => {
  event.target[0].value = "";
  supabase.auth
    .signOut()
    .then(() => {
      console.warn("signed out successfully");
    })
    .catch((err) => {
      console.error("error while signing out", err);
    });
};
It will clear the email field, and destroy the session cookie on both the Supabase side, and delete the jwt token from the browser localstorage.
The onAuthChange also has a bit where it deals with signing out: it will mark the sign out button as disabled, so users can’t click it again, and clears the links from the view.
Tying it all together
I tried to write this article in a way that you can follow along. By this point you should have this working all together.
To recap though:
- We've opened a Supabase account, and are using it to both authenticate users using a magic link, and to keep track of what email addresses have what Stripe customer ID relationships.
- There are two serverless functions deployed to Netlify that take care of grabbing the session links from Stripe, and making sure the data we have in Stripe is up to date.
- Stripe is configured such that there’s a minimally permitted key to create the session links, and also to send updates to our serverless function in Netlify when a customer is created / updated / deleted.
- The front end of the website has Supabase SDK imported and functionality set up so users can sign in and see session links created for them from your own domain.
All of this in a reasonably secure way that should be good enough for most use cases.
Now go forth and build yourself a business!
Photo by Oudom Pravat on Unsplash